Rust dynamic analysis #
There are two categories of dynamic analysis: fuzz testing and “standard” testing, like unit and functional testing.
In this chapter, we will focus on standard testing. This is the basic level of testing that every project should have implemented. While basic, standard testing can be built up with a lot of security-wise improvements. To read about Rust fuzzing, see the Rust fuzzing chapter of this handbook.
The standard tool for executing unit tests for Rust codebases is
cargo test. The basic setup and usage of the tool is well known, so we will skip the introduction. You can also try
cargo nextest, a new test runner.
#[cfg(test)]
mod tests {
    #[test]
    fn true_dilemma() {
        assert_ne!(true, false);
    }
}
Once you have the unit tests written and all of them pass, let’s improve on them.
To speed up the CI pipeline, use
cargo-line-test. It executes only the tests that exercise modified files and lines. It may be especially useful when using advanced but slow testing methods described later in this section.Randomization #
Test order shuffling #
Tests that depend on a global state or have dependencies between each other may be buggy but pass when executed normally. By default, tests are executed in multiple threads and in (mostly) alphabetical order. Therefore, they are quasi-deterministic.
To find problematic test dependencies, increase the entropy of execution. Ideally, run tests without parallel execution in a random order:
cargo test -- -Z unstable-options --test-threads 1 --shuffle
Note that random order shuffling is
not possible with nextest.
This approach is not scalable and should not be extensively used in CI/CD pipelines. Instead, start such tests manually once in a while.
Execute the cargo test command above multiple times. If any run reports a failed test, use the displayed “shuffle seed” to reliably repeat the error.
Example to try: cargo test shuffle seed
The tests below fail randomly when run with cargo test. To get a reproducible failure, run this:
cargo test -- -Z unstable-options --test-threads 1 --shuffle-seed 1337
fn main() { println!("Hello, world!"); }

static mut GLOB_VAR: i32 = 2;

unsafe fn global_var_set(arg: i32) {
    GLOB_VAR = arg;
}

#[cfg(test)]
mod tests {
    use crate::{GLOB_VAR, global_var_set};

    #[test]
    fn a_true_dilemma() {
        unsafe { assert_eq!(GLOB_VAR, 2); }
        unsafe { global_var_set(5); }
        unsafe { assert_eq!(GLOB_VAR, 5); }
        assert_ne!(true, false);
    }

    #[test]
    fn not_true_dilemma() {
        unsafe { assert_eq!(GLOB_VAR, 2); }
        assert_ne!(true, false);
    }
}
Features randomization #
Rust code supports conditional compilation via Cargo features. Ideally, tests would cover all possible versions of a program. To ensure that, we need to run tests against all possible (or supported) combinations of features.
For this task, use
cargo hack. Start with testing your code against all the features taken separately, then combine multiple features in one run:
cargo +nightly install cargo-hack --locked
cargo hack test --no-dev-deps --each-feature
cargo hack test --no-dev-deps --feature-powerset --depth 2
- uses: taiki-e/install-action@6da51af62171044932d435033daa70a0eb3383ba
  with:
    tool: cargo-hack
- run: cargo hack test --feature-powerset --depth 2 --workspace
Look for the info: running string in the test output to check what features were used.
Use the
--print-command-listoption for a dry run.Use the
--keep-goingoption to skip over compilation failures.
Example to try: cargo hack with three features
The test below passes when run with the cargo test command. It also passes with cargo hack test --each-feature. To find the code path that makes the test fail, run this:
cargo hack test --feature-powerset --depth 2
# Cargo.toml
[features]
fone = []
ftwo = []
fthree = []
fn main() { println!("Hello, world!"); }

#[allow(unreachable_code)]
fn feature_one() -> i32 {
    #[cfg(all(feature = "fone", feature = "fthree", not(feature = "ftwo")))]
    {
        return 3;
    }
    #[cfg(feature = "fone")] {
        return 1;
    }
    #[cfg(feature = "ftwo")] {
        return 2;
    }
    return 0;
}


#[cfg(test)]
mod tests {
    use crate::{feature_one};

    #[test]
    fn feature_test1() {
        let z = feature_one();
        assert!(z < 3);
    }
}
Integer overflows #
Most integer overflows are detected at runtime in debug builds (or when the
overflow-checks flag is set). There is also
Clippy’s arithmetic_side_effects lint, which can statically find possible overflows.
However, neither of these approaches detects overflows in explicit casts. To make your tests detect overflows in expr as T expressions, you can use the
cast_checks tool.
Install it by adding the following to your project’s Cargo.toml file:
[dependencies]
cast_checks = "0.1.5"
Then, mark functions where you suspect overflows may be possible with #[cast_checks::enable] and run tests as usual.
Alternatively, enable the inner attributes feature with #![feature(custom_inner_attributes, proc_macro_hygiene)] and put the #![cast_checks::enable] attribute in relevant modules.
Example to try: cast_checks in action
In this example, the int_overflow_simple test always passes, as arithmetic overflows are detected with standard overflow checks. However, to detect overflow in the int_overflow_in_cast test, cast_checks needs to be used.
#![feature(custom_inner_attributes, proc_macro_hygiene)]

fn main() { println!("Hello, world!"); }

mod overflow_lib {
    #![cast_checks::enable]

    pub(crate) fn do_overflow(a: i32) -> i32 {
        return a * 8;
    }

    pub(crate) fn as_u16(z: i32) -> u16 {
        z as u16
    }
}

#[cfg(test)]
mod tests {
    use crate::{overflow_lib::as_u16, overflow_lib::do_overflow};

    #[should_panic]
    #[test]
    fn int_overflow_simple() {
        let y_str = "2147483647";
        let y = y_str.parse::<i32>().unwrap();
        let x = do_overflow(y);
    }

    #[should_panic]
    #[test]
    fn int_overflow_in_cast() {
        let y_str = "2147483647";
        let y = y_str.parse::<i32>().unwrap();
        println!("{}", y);
        let a = as_u16(y);
    }
}
Due to performance considerations, you are likely to want to enable the overflow checks only for testing and debug builds, not for release.
Sanitizers #
While Rust is memory-safe, one may open a gate to the unsafe world and introduce all the well-known vulnerabilities like use-after-free and reading of uninitialized memory. Moreover, the Rust compiler does not provide strong guarantees about memory leaks and general race conditions.
To find deep bugs, we can run tests with various sanitizers. Sanitization in this context means that builds are instrumented during compilation and linked with specialized runtime libraries. Then, when executed, the instrumentation looks for a specific class of issues. Running tests with sanitizers comes with the downsides of increased compilation time, execution time, and memory usage.
These are the available sanitizers supported by Rust:
- AddressSanitizer
- HWAddressSanitizer
- LeakSanitizer
- MemorySanitizer
- ThreadSanitizer
To enable them, add the RUSTFLAGS environment variable.
At this time, nightly toolchains must be used for sanitizers. If you use the stable toolchain, the compilation fails with the following error:
error: failed to run rustc to learn about target-specific information
for sanitizer in "address" "leak" "memory" "thread"; do
 echo "Testing with $sanitizer"
 export RUSTFLAGS="-Z sanitizer=$sanitizer"
    export RUSTDOCFLAGS="$RUSTFLAGS"
 cargo test --target x86_64-unknown-linux-gnu
done
for sanitizer in "address" "leak" "memory" "thread"; do
 echo "Testing with $sanitizer"
 export RUSTFLAGS="-Z sanitizer=$sanitizer"
    export RUSTDOCFLAGS="$RUSTFLAGS"
 cargo nextest run --target x86_64-unknown-linux-gnu
done
A few tips:
If compilation fails, add an explicit
--targetoption and use the nightly toolchain.Use the
rustup toolchain listcommand to find available toolchains.Not all targets are created equal. Check which are supported by the given sanitizer.
Use both
RUSTFLAGSandRUSTDOCFLAGSif there are any doctests.Sanitizers are not compatible with each other. Compile with one sanitizer at a time. One exception is AddressSanitizer and LeakSanitizer that can work together.
It is required to recompile the standard library with
-Zbuild-stdwhen using ThreadSanitizer and MemorySanitizer. It is recommended for AddressSanitizer.MemorySanitizer needs all the code to be sanitized. Any C/C++ dependencies must be built with the
-fsanitize=memoryflag (in addition to the standard library).Note the following for ThreadSanitizer:
A known limitation is lack of support for
std::sync::atomic::fenceand inline assembly code.To reduce false positives, use a single thread for testing (
RUST_TEST_THREADS=1or--test-threads=1). Note that ThreadSanitizer errors on multi-threaded test execution may indicate bugs in tests themselves (not in the actual code) and may be worth investigating.
Example to try: testing with ASAN
The test below passes, but there is actually a bug. AddressSanitizer can help us find it.
RUSTFLAGS='-Z sanitizer=address' cargo -Zbuild-std --target x86_64-unknown-linux-gnu test
fn main() { println!("Hello, world!"); }

#[cfg(test)]
mod tests {
    #[test]
    fn uaf() {
        let a = vec![7, 3, 3, 1];
        let b = a.as_ptr();
        drop(a);
        let z = unsafe { *b };
    }
}
Miri #
Miri is an interpreter for Rust’s “mid-level intermediate representation.” Miri helps to detect undefined behaviors like these:
- Memory corruption bugs
- Memory leaks
- Uses of uninitialized data
- Memory alignment issues
- Issues with aliasing
- Data races
To use Miri, you must point it at some executable code (it performs dynamic analysis). The easiest is to run your tests through Miri. Note that the nightly toolchain is required.
rustup +nightly component add miri
cargo miri test
cargo miri nextest run
Alternatively, you can replace debug builds with Miri for use in testing environments. You need to replace the compiled binary with the invocation of a full Cargo command, as Miri does not compile instrumented binaries but rather is an interpreter.
cargo miri run
Lastly, you can combine fuzzing with Miri. The fuzzer should produce inputs that make the test harnesses cover a decent fraction of the code, probably more than unit tests. Miri can take advantage of the generated inputs:
- Fuzz your code as usual.
- For every file generated by the fuzzer, run the code under Miri.
Unfortunately,
there is no single command to combine fuzzing with Miri. You need to add a test for every harness. To do that efficiently you can use test fixtures via
rstest crate. For example, the code to fuzz the binary fuzz_target_1 could look like this:
#![cfg_attr(not(any(miri, test)), no_main)]

use libfuzzer_sys::fuzz_target;
use rust_tests::check_buf;
fn harness(data: &[u8]) {
    check_buf(data);
}

fuzz_target!(|data: &[u8]| {
    harness(data);
});

#[cfg(test)]
#[cfg(miri)]
mod tests {
    use {
        crate::{harness},
        rstest::rstest,
        std::{fs::File, io::Read, path::PathBuf},
    };

    #[rstest]
    fn miri(#[files("corpus/fuzz_target_1/*")] path: PathBuf) {
        let mut input = File::open(path).unwrap();
        let mut buf = Vec::new();
        input.read_to_end(&mut buf).unwrap();
        harness(&buf);
    }
}
You’d then run this command. The Miri isolation must be disabled in order to access the corpus files.
MIRIFLAGS="-Zmiri-disable-isolation" cargo miri nextest run --bin fuzz_target_1
Keep these tips in mind while using Miri:
Miri can be pretty slow.
Use it carefully in CI jobs.
Try to slice your tests into reasonably sized functions.
Disable the longest-running tests if needed.
Consider disabling the most heavy Miri detectors like
-Zmiri-disable-stacked-borrowsand-Zmiri-disable-validation.Use
--test-threadsor-jflag withnextestto improve the speed.- Data races on resources shared between testing threads will not be detected.
Note that doctests are not supported yet by
nextest.For safe programs, Miri still can provide value.
Bugs may lie inside unsafe dependencies.
Memory leaks and some data races can be present even in safe Rust.
Miri implements a very limited subset of operating system APIs.
It includes only basic support for stdout printing, filesystem access, and environment variables.
It has no FFI support.
You may need to split your tests into “impure” functions (those that call unimplemented APIs) and “pure” functions (those that do not), and run Miri only on the latter.
Use
MIRIFLAGS="-Zmiri-disable-isolation"andRUSTFLAGS="-Zrandomize-layout"to make runs less deterministic.Miri downloads and compiles Rust sysroot when compiling your code.
- You must enable network access and disable dependency vendoring to use Miri.
Some of Miri’s checks are not enabled by default.
- For example, use
-Zmiri-tree-borrowsto replace experimental stacked borrows with (also experimental and newer) tree borrows.
- For example, use
Keep an eye on Ralf’s blog, where new Miri features are summarized.
Example to try: Miri in action
The test below should pass or fail on the assertion. Miri would detect undefined behavior.
fn main() { println!("Hello, world!"); }

#[cfg(test)]
mod tests {
    fn x() {}


    #[test]
    fn miri_example() {
        let f = x as *const usize;
        let y = unsafe {
            *f.map_addr(|a| a + 8)
        };
        assert_eq!(y, 0x841f0f);
    }
}
Property testing with proptest #
Normal unit tests are great for testing a single scenario. You test code by providing a single, specific value and checking if the code behaves as expected.
But instead of using a single value, you can generate a set of inputs and execute the unit test multiple times to check if it works correctly for every input. This is called “property testing,” as you are effectively verifying that some property (the test case) holds for all (or many) expected inputs.
How do you know if you should use property testing over normal unit testing?
- Property testing: Complex code, tedious to enumerate examples, high correctness requirements, high-leverage scenarios
- Unit testing: Simple code, behavior best communicated by specific cases, regression tests
Let’s use the proptest tool for the task. It is a tool inspired by the famous QuickCheck.
First, install the tool as a dev dependency:
[dev-dependencies]
proptest = "1.5.0"
To use proptest, you must write unit tests. But instead of hard-coding values that are used for testing, you define generators for values (called “strategies” in proptest’s docs). Proptest will execute the unit test dozens of times with randomly generated values.
Proptest ships with many configurable strategies:
- Range-like generator for integers
- Regex generator for strings
- Simple generators for
bit,bool, andcharvalues - Random-size generators for
std::collections - Generators for
OptionandResult
The generators can be combined together. You can also use macros to further combine and restrict generation:
- Do mapping with
prop_map! - Do filtering with
prop_filter! - Create enums with
prop_oneof! - Do recursion with
prop_recursive!
Let’s see some example code:
fn simple_thingy_dingy(a: u64, b: &str) -> u64 {
    return a + match b.parse::<u64>() {
        Ok(x) => x,
        Err(_) => b.len() as u64,
    };
}

#[cfg(test)]
mod tests {
    use crate::simple_thingy_dingy;
    use proptest::prelude::*;

    proptest! {
        #![proptest_config(ProptestConfig::with_cases(100))]
        #[test]
        fn test_simple_thingy_dingy(a in 1337..7331u64, b in "[0-9]{1,3}") {
            println!("{a} | {b}");
            let sum = simple_thingy_dingy(a, &b);
            assert!(sum >= a);
            assert!(sum > 1337);
        }
    }
}
The simple_thingy_dingy function is a function we want to unit-test. To do so, we need to wrap the test for it with the proptest! helper. Then, we use two generators for values a and b: a range-like generator for integers and a regex generator for strings.
Now, we just need to run cargo test and wait for the proptest to finish. Running cargo test -- --show-output will enable us to observe what values were generated.
By default, proptest executes a unit test 256 times, but we can change that with ProptestConfig::with_cases.
If the test finds an input failing the unit test, it writes the input to the proptest-regressions directory.
As can be seen, we have to write a strategy for every single value we use. However, we could instead create
a strategy for a type using the Arbitrary trait.
#[cfg(test)]
mod tests {
    use proptest::prelude::*;
    use proptest_derive::Arbitrary;

    #[derive(Debug, Arbitrary)]
    struct Point {
        #[proptest(strategy = "-100i32..=100")]
        x: i32,
        #[proptest(strategy = "-100i32..=100")]
        y: i32,
    }

    impl Point {
        fn distance_from_origin(&self) -> f64 {
            ((self.x.pow(2) + self.y.pow(2)) as f64).sqrt()
        }
    }

    proptest! {
        #[test]
        fn test_distance_is_non_negative(point: Point) {
            prop_assert!(point.distance_from_origin() >= 0.0);
        }

        #[test]
        fn test_distance_within_bounds(point: Point) {
            // Max distance: sqrt(100^2 + 100^2) ≈ 141.4
            prop_assert!(point.distance_from_origin() <= 150.0);
        }
    }
}
You can combine proptest with other improvements like sanitizers and Miri to enhance your testing even further.
To use proptest with Miri, you have to disable persistence (the
proptest-regressionsdirectory):PROPTEST_DISABLE_FAILURE_PERSISTENCE=true \ MIRIFLAGS='-Zmiri-env-forward=PROPTEST_DISABLE_FAILURE_PERSISTENCE' \ cargo miri test
Finally, use our
property-based-testing Claude skill to automate the testing.
Coverage #
It is critically important to know how much coverage your tests have. Coverage gathering consists of four steps:
- Compile-time instrumentation
- Execution of tests, producing “raw” data
- Merge of per-execution run results
- Conversion of merged data to a usable format (like an html report)
There are two main data formats:
- LLVM-style:
profraw(per-process) andprofdata(merged) - gcov-style:
gcno(produced during compilation) andgcda(produced during execution)
The two pipelines line up roughly like this:
| Stage | LLVM | gcov |
|---|---|---|
| Compile-time mapping | __llvm_covmap section in binary | .gcno |
| Per-run raw output | .profraw (one per process) | .gcda (merged in place at process exit) |
| Offline merge tool | llvm-profdata merge → .profdata | gcov-tool merge (still .gcda) or lcov --add-tracefile (→ .info) |
| Report consumer | llvm-cov reads .profdata + binary | gcov / lcov / genhtml read .gcno+.gcda or .info |
There are four common instrumentation backends (engines):
- LLVM Instrument Coverage
- Compiler front-end inserts per-source-region counters, so the instrumentation knows about source-level constructs.
- Counters are incremented in-process during execution and dumped at process exit by the
__llvm_profile_*runtime.
- LLVM SanitizerCoverage
- Compiler inserts low-overhead
__sanitizer_cov_*callbacks at functions, basic blocks, edges, or comparisons. - Callbacks fire at runtime and are consumed in-process by fuzzers for corpus guidance.
- Compiler inserts low-overhead
- GCC
gcov- Compiler back-end pass instruments CFG arcs (basic-block edges), with no source-level awareness beyond debug info.
- Counters are incremented in-process during execution and flushed at process exit by the gcov runtime.
- ptrace-based
- No compile-time instrumentation; a tracer places
INT3breakpoints on each statement’s first instruction. - The tracer counts hits at runtime by handling
SIGTRAPviaptrace.
- No compile-time instrumentation; a tracer places
The gcov engine is
no longer supported by Rust.
The engine and gcov-style format is still often used for C/C++ codebases.SanitizerCoverage is not meant for general coverage analysis, but for fuzzing.
Three popular tools wrap the above engines for easier consumption in Rust projects:
grcov,
llvm-cov, and
tarpaulin.
| Feature/tool | grcov | llvm-cov | tarpaulin |
|---|---|---|---|
| Backends | LLVM | LLVM | LLVM, ptrace |
| Consumes | profraw/profdata or gcno/gcda | profraw/profdata | its own raw output |
| Coverage | Lines, functions, branches | Lines, functions, branches, regions, MC/DC | Lines |
| Output format | LCOV, JSON, HTML, Cobertura, Coveralls+, Markdown, ADE | Text, LCOV, JSON, HTML, Cobertura, Codecov | Text, LCOV, JSON, HTML, XML |
| To exclude files | --ignore | --ignore-filename-regex | --exclude-files |
| To exclude functions | With in-code markers and regexes | With attributes | With attributes |
| To exclude test coverage | No | With external module | --ignore-tests |
| To enable coverage for C/C++ | Unknown | --include-ffi | Unknown |
| Merges runs across different builds? | No | Yes | Yes (but only shows delta) |
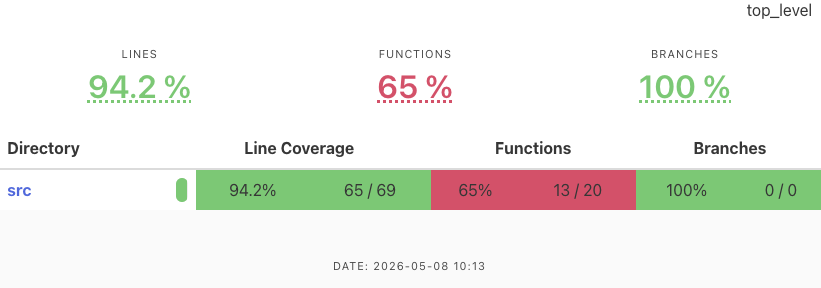
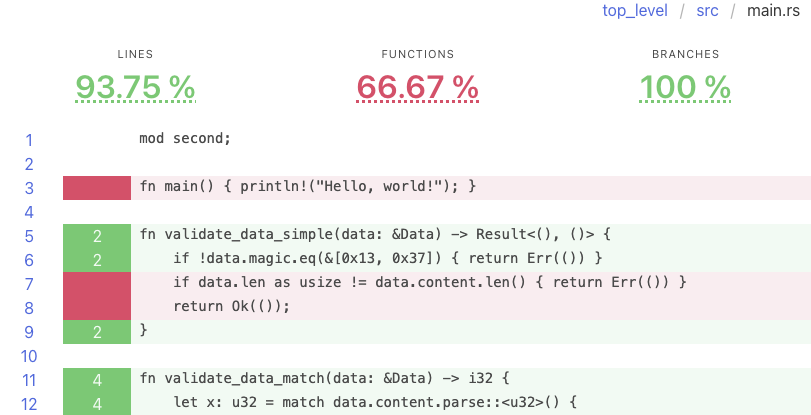
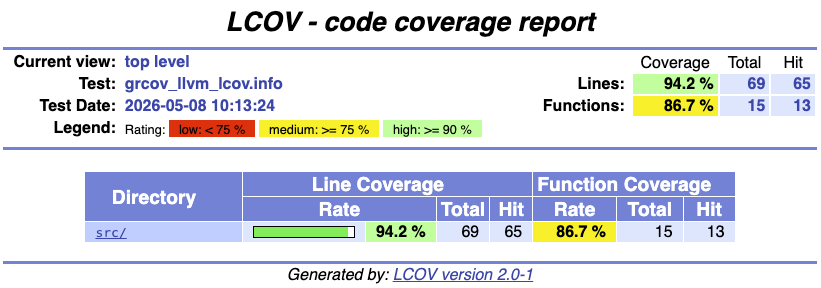
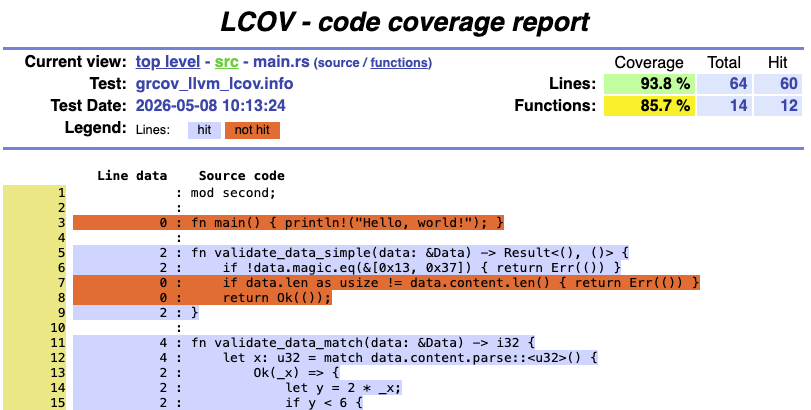
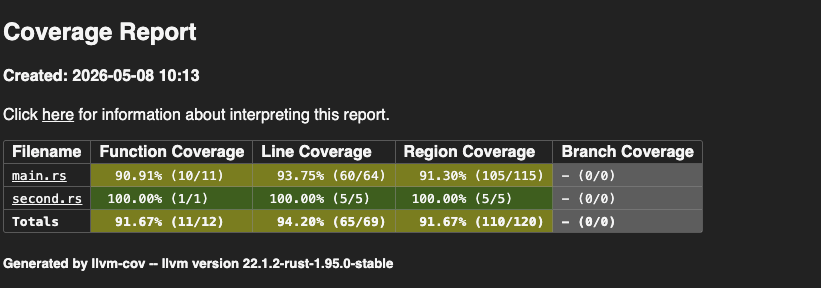
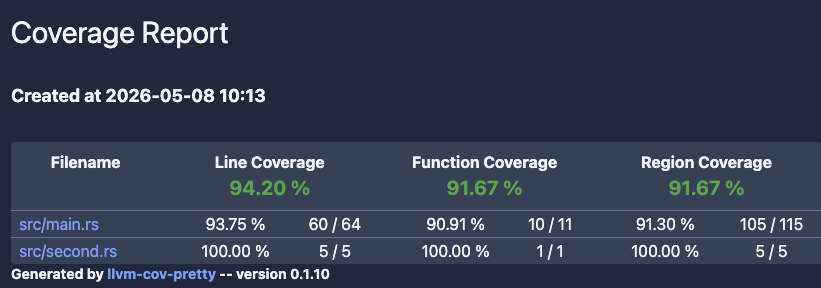
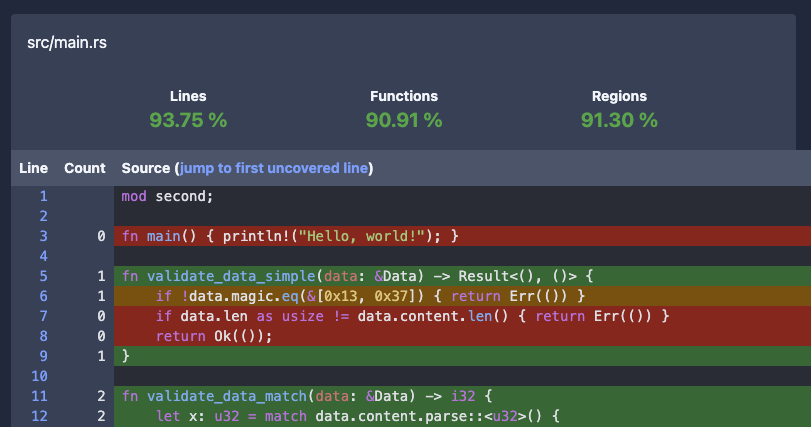
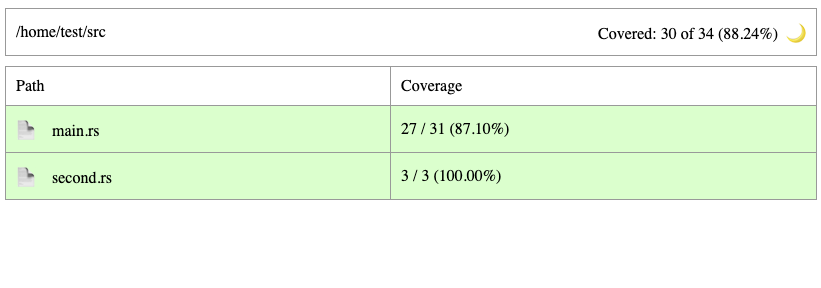
While checking coverage statistics from a command line and using one of many coverage visualizers, an HTML report is often what you need.
| HTML output/tool | grcov | llvm-cov | tarpaulin |
|---|---|---|---|
| Examples | Open grcov
Open grcov with lcov | Open llvm-cov
Open llvm-cov-pretty | Open tarpaulin |
| Handles Rust’s constructions? | Yes | Yes | Yes |
| Expands Rust’s generics? | No | --show-instantiations | No |
| Includes number of hits? | Yes | Yes | Yes |
| Supports multi-file output? | Yes | Yes | No |
These are our general recommendations for generating test coverage:
- Use
llvm-cov(withllvm-cov-pretty) for rapid testing. It is the easiest to run, it resolves generics, and it produces pretty HTML output. - Use either
llvm-covorgrcovfor complex projects. Both are decent and can produce readable outputs. - Use
tarpaulinwhen other tools work incorrectly. The developers claim that this can happen in the event of the following:- The code panics unexpectedly.
- There are race conditions.
- The code forks.
For profiling, consider using
measureme, possibly with
Miri and Chrome DevTools.
Go to the
Testing Handbook repository’s materials/rust/coverage folder.
There you will find a Dockerfile that generated HTML reports shown above.Validation of tests (mutation testing) #
Who tests the tests? What if tests miss an important branch? What if your critical test has a bug that makes it pass incorrectly? We recommend using mutation testing to validate your tests.
Gaps in test coverage #
Mutation testing involves modifying the source code and then running the tests to see if they catch those modifications (called mutants). You can read more about this testing technique in our blog post “Use mutation testing to find the bugs your tests don’t catch”.
For starters, you need basic but decent unit test coverage. Then, use one of the following tools to automatically get a list of code areas that are not sufficiently tested or may be buggy.
- Easy to use
- Parses the AST of every file with the
synlibrary - Partially type-aware
- Can divide jobs between multiple machines
- Multiple languages supported
- Require more manual setup than
cargo-mutants - Two parsing modes: regexes and Comby
- Trivial Compiler Equivalence (TCE) optimization to eliminate redundant mutants before test runs
Bugs in existing tests #
A unique approach to finding bugs in tests is to mutate them and check if they pass. If they do, it indicates that something may be wrong with them. This is different from mutating the actual code: we aim to find bugs in the tests, not coverage gaps or bugs in the code.
To automate the process of mutation and validation, use Necessist.
cargo install necessist
Necessist works by iterating over the statements in each test, removing them one at a time, and checking whether the test still passes. A mutated test that passes with an instruction removed is shown as the following:
filename:line-line `removed code` passed
If a test still passes after an instruction was removed, then that instruction is redundant and does not change the test’s behavior, indicating there may be a bug in the test. A manual investigation is then needed to determine if there really is a bug.
While Necessist aims to find bugs in the tests, its findings can sometimes reveal issues in the actual code.
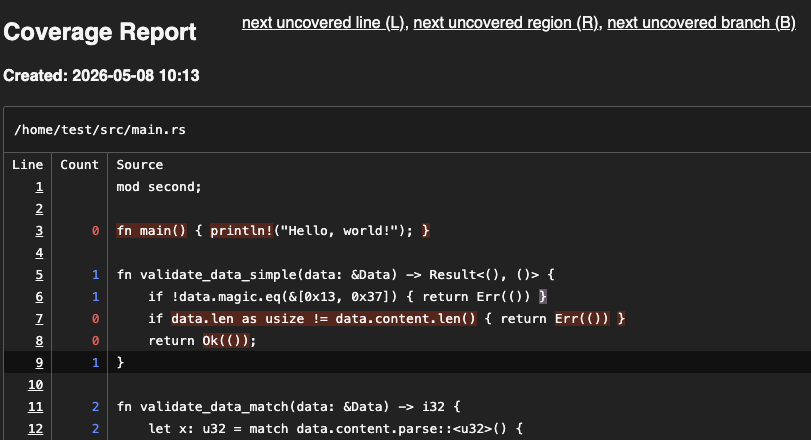
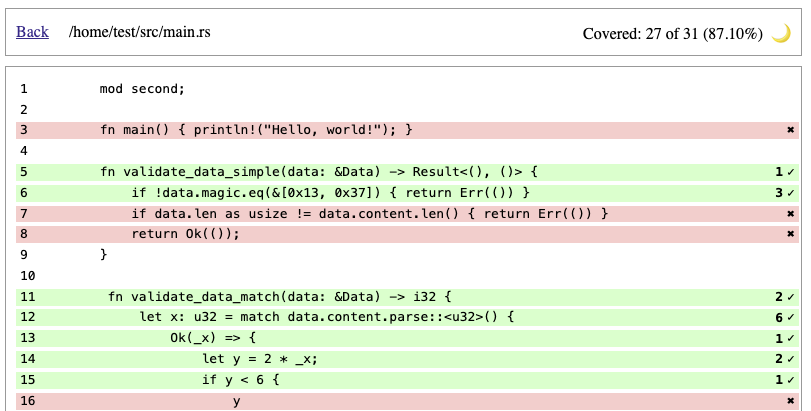
Example to try: testing with Necessist
Necessist should report that the parser_detects_errors test passes even if one line is removed from it. This indicates that the magic number in either the test or the validate_data function is incorrect, preventing the “real” bug from being tested properly.
fn validate_data(data: &Data) -> Result<(), ()> {
    if !data.magic.eq(&[0x13, 0x37]) { return Err(()) }
    if data.len as usize != data.content.len() { return Err(()) }
    return Ok(());
}

struct Data {
    magic: [u8; 2],
    len: u8,
    content: String
}

#[cfg(test)]
mod tests {
    use crate::{Data, validate_data};

    #[test]
    fn parser_detects_errors() {
        let mut blob = Data{
            magic: [0x73, 0x31],
            len: 2,
            content: "AB".parse().unwrap(),
        };
        blob.content = blob.content + "Y";
        let result = validate_data(&blob);
        assert!(result.is_err());
    }
}
Necessist is slow and sometimes produces a nontrivial number of false positives. We recommend running it manually from time to time instead of in a CI pipeline.
The tool produces a necessist.db file that can be used to resume an interrupted run. The database should be retained between runs to accelerate new tests.
Resources #
- “The Rust Programming Language,” chapter 11: Testing: The basics of unit and integration testing in Rust
- Ed Page’s “Iterating on Testing in Rust”: Lists potential issues with
cargotestand introducescargo-nextest - Unsafe Rust and Miri by Ralf Jung - Rust Zürisee June 2023